Mermaid Craft: Upcycling Old Jeans
One of the reasons why I am trying to get better at sewing is so that I do not have to rely on fast fashion and that disposable way of thinking. Oh, these jeans have a hole in them? Better bin them. No! While there are some items of clothing that once they have holes in them they become unwearable, but I am mostly thinking undies here and they definitely have a shelf life. But a perfectly wearable pair of jeans your chunky butt tore a hole in? Well, that's a different story.
 |
| The original offending hole. |
And that is exactly what I was working with: an old pair of work jeans which went threadbare in the butt. (Naturally, I found this out midshift, when they finally gave way.) Not enough of my wardrobe actually fits me - my fluctuating weight makes things tight or loose, or weirdly both. But these jeans consistently fit me, hence why I wore them to work. The last thing I need with my hands full is a pair of droopy drawers. So while they have been officially retired and replaced for work, it does not mean they do not still have life in them.
I have some odds and ends of fabric and there were a couple other patches which were looking a little worse for wear. So I decided to patch the existing hole and make a couple more to patch would be a great way to breathe some new life into these jeans. I figured three would be a good starting place: one for each leg, plus the butt patch. I can always add more if I get more funky materials. (That or replace any failing patches.)
 |
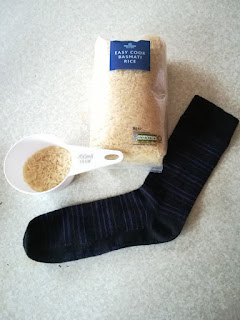
| My chosen materials |
I had some leftover material from the napkins I made, the star material I bought in Oswestry the other week, and some Hufflepuff pyjama bottoms where the elastic has perished. I am not good enough to fix perished elastic and I thought these jeans could do with some house pride, Hufflepuff for the win! With my materials picked, I just had to decide which went where. I decided to go for:
 |
| Hole two: slash in the thigh. |
- Existing hole = leftover napkin: The black on black wouldn't draw too much attention to the fact there is/was a hole in the seat of my trousers - especially if the sewing work doesn't hold up well!
- New hole on left thigh = star material. I even had blue thread to match the star. I wanted these patches to feel more on purpose.
- New hole on right knee = Hufflepuff crest. The knees are particularly worn on these jeans, so I could get a bigger hole to show off the crest. Again, framed with yellow thread to match the house colours.
 |
| I grew up in the nineties, ripped jeans were cool then. |
Now all I had to do was sew it all together!
HOW I DID IT
To make the new holes, I honestly just attacked the jeans with the sharpest scissors in my study. I took out more material on the knee because it was easier to just cut the whole worn section off, whereas with the thigh I just tried to create the best slash I could.
 |
| Pinned and ready to go |
With patching, I lined the material up against the patches and cut a patch which was much bigger than the hole it was covering. I did this to allow myself plenty of sewing space and room for the holes to grow and still be covered - as a just in case, really. I did all the sewing inside-out, which did make it difficult to judge how well it was going, but I honestly thought that constantly turning them in and out would just make my like much more difficult and create the opportunity to lose the needle. Or stab myself, which I already do plenty.
 |
| Sewn in. |
I pinned each patch in place before starting to sew, anchoring it in. I had to be aware of how many layers I was sewing through, as I still actually want to wear the jeans. Sewing the leg shut would not be best! This was especially important in the seat of my jeans as there were so many places I could accidentally sew to.
HOW DID IT GO?
Pretty well, if I do say so myself. Obviously, I did go wrong in a couple places. On the seat, I did sew it to the leg which I managed to catch and hopefully rectify. I didn't notice when I sewed it to the back pocket however, so there is a random long thread jutting out to it. I was wary of cutting it out when I found it at the end, for fear of the whole thing coming undone. So if anyone asks, it was on purpose.
 |
| The hardest one. |
The butt patch was the hardest on to sew in general. The positioning was awkward, being right on the seam was tough to push the needle through even if it did provide a handy guideline to follow. It was also awkward because there was just so much more material to worry about.
 |
| But all fixed! |
However, with the other patches, it got a lot easier and my stitches are almost straight in places! Only time will tell if the patches survive. They need a proper testing - being worn and washed. I'll keep you updated. But for now, I think they look great and I am very happy with how they turned out. They are worth jabbing myself all those times on the needle!
 |
| Star patch! 🌟 |
 |
| Hufflepuff pride! |
(Sorry, no butt patch pic, that is not an easy picture take. Plus, I am not that sort of mermaid.)
What clothes have you upcycled? How are you fighting fast fashion? Got any other ideas for me to try out? Lemme know below!
Listening to: Indie Sunshine


Comments
Post a Comment