Mermaid Craft: Pillow
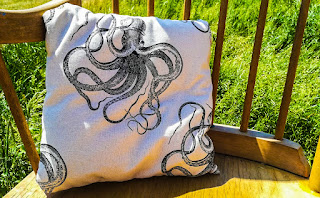
Cast your minds back to June 2nd. This was the day I announced my act of wildness was to do some sewing in the garden. Today, I'm going to tell you how I made my project: the pillow.
A friend of mine had tagged me in a post about aquatic themed pillows and I cannot tell you how much I wanted them! Sadly, it was not something I could justify spending money on presently. But it did remind me that I not only have a beautiful, aquatic-themed fabric but also the stuffing to make my own pillow. And make my own, I did!
Feeling brave, I did not follow a method found online I did it all off my own brain. From what I've learned through sewing other things I knew it needed to be inside out, my shape was not complicated, and I was feeling confident. So I went for it!
All in all, it was pretty easy. After sewing the first edged, I decided it would be prudent to sew back along it - the last thing I wanted was for the stuffing to seep between my stitches! The trickiest bit was sewing the gap left to use for stuffing. I left a small a gap as possible in the hopes that it would not leave an obvious patch. With hindsight, it would have been better to sew in a zip for a tidier finish - but hey ho! That's what hindsight is for. Next time I can add a zip. I would also need to buy a zip.
YOU WILL NEED
- Needle
- Thread
- Pins
- Pretty fabric
- Long ruler and/or cutting mat
- Scissors
- Pencil
- Stuffing
- Something long to help with stuffing - kebab skewer perhaps
METHOD
- Pick your fabric and lay it pattern down on your cutting mat. Decide on the size of your pillow and mark it onto your fabric. I went 13'x13' but you can make it any size you want.
- Using the ruler, extend these lines so you have something to follow when cutting.
- Cut out your square - this is the first side of your pillow!
- Repeat steps 1-3 to make the second side of your pillow. If it's easier, you can use the first side as a measuring guide.
- Place the pieces of fabric pattern side together and line them up the best you can. Don't worry if they are slightly different sizes, any excess is going to be on the inside of the pillow. Pin them together. On the fourth side, don't pin it all the way - this will serve as a reminder to leave a gap!
- Get a nice long thread and start sewing! Keep your stitches as neat as possible, straight and not too spaced out. When you reach the end of you edge, flip it over and sew back the way you came. Use this as a chance to fill in any gaps and strengthen your existing stitches. Tie a knot at the end.
- Repeat for sides 2 and 3.
- For the fourth side, sew up to the end of the pins and turn back at that point.
- Your pillow should be 90% sewn together now. At this point, turn it the right way round, using the gap you left.
- Now to stuff! I tore my stuffing into smaller pieces to fit it through the gap and make it easier to reach the corners. This is where my kebab skewer came in handy too! I used it to smush (technical term) the stuffing into the nooks I couldn't reach with my hands alone.
- When you've achieved optimal squishiness (also a technical term), it's time to sew up the gap. Fold in the edges so the messy ends will still be on the inside, even though the stitches won't be.
- Sew with small and close stitches to negate the need to stitch back on yourself. That way your knot won't be in the middle of your pillow. That or start in the corner and sew your way back to it, whichever you feel is more necessary for your skills.
- And you're done! Decorate your sofa or favourite chair with your new, favourite pillow!
I am looking forward to making more pillows. I am currently mid-way through converting an old band t-shirt into a pillow - I ran out of stuffing! In addition to pillows, I have been experimenting with other patterns which I shall be blogging about in the near future. In the mean time, if anyone has any craft ideas let me know!
Will you be trying to make a pillow? Would you like me to make it for you?(!) What is your favourite craft you've made? Lemme know, below!
Listening to: 90s Smash Hits


Comments
Post a Comment